
10.3: Animate Objects
Object animations can establish reading order, direct attention, or show a change. Use them to support the explanation rather than to decorate every object.
In this section, you will add entrance, emphasis, and exit effects, configure timing and direction, preview them, and remove effects you no longer need.
Before You Begin
Open a slide and select one object. The Animations button appears in the selection toolbar. A small indicator appears on that button when the selected object has an animation.
1. Add An Entrance Effect
Select Animations, then choose an effect under Entrance Effects. Moving the pointer over a tile previews that effect; selecting the tile applies it and opens its settings.
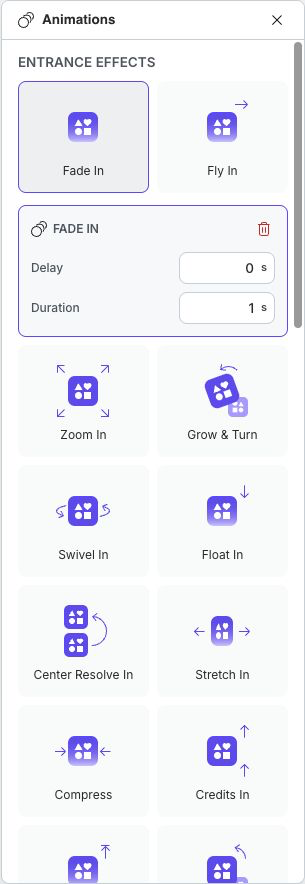
The current Entrance gallery includes Fade In, Fly In, Zoom In, Grow & Turn, Swivel In, Float In, Center Resolve In, Stretch In, Compress, Credits In, Rise Up, Pinwheel In, Basic Float In, and Boomerang In.
Configure the effect as needed:
- Delay is the time before the entrance begins.
- Duration is how long the effect plays.
- Direction appears only for effects that support directional movement.
Use a short, consistent delay to establish reading order. Large delays can make a responsive slide feel broken.
2. Add An Emphasis Effect
Choose an effect under Emphasis when an object that is already visible needs attention. The available effects are Spin, Teeter, Pulse, Grow, Shrink, Complementary Color, and Blink.
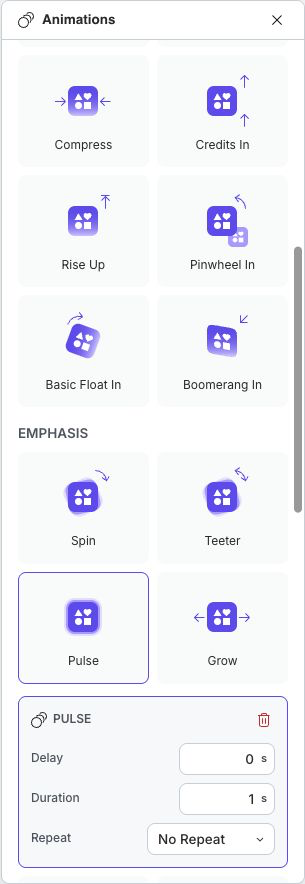
For emphasis effects:
- Delay is measured from the moment the entrance effect finishes.
- Duration controls one play of the effect.
- Repeat lists Infinite, No Repeat, and the preset counts 1, 2, 3, 5, and 10, and also accepts a typed count. A count of
1repeats once after the first play. - Direction appears for effects such as Spin, Grow, and Shrink.
Avoid Infinite for content learners must read or operate. Continuous movement can make text and controls difficult to use.
3. Add An Exit Effect
Choose an effect under Exit Effects when the object should leave as the presentation advances from the slide. Exit effects include the matching Fade Out, Fly Out, Zoom Out, Shrink & Turn, Swivel Out, Float Out, Center Resolve Out, Stretch Out, Collapse, Credits Out, Sink Down, Pinwheel Out, Basic Float Out, and Boomerang Out choices.
An exit effect provides Duration and, where supported, Direction. It does not show Delay because the effect plays as the slide advances; delaying it would hold the learner between slides.
4. Understand Animation Order
An object can keep one effect in each section: one Entrance, one Emphasis, and one Exit. Selecting a different effect in a section replaces only that section's current effect.
The current pane does not provide drag-to-reorder controls. The sequence is defined by the three sections: Entrance, then Emphasis, then Exit. Use Delay, Duration, and Repeat to shape the timing within that sequence.
5. Preview Or Remove An Effect
Move the pointer over an effect tile or a direction button to preview it on the canvas. Select Present to check the complete slide sequence with real navigation timing.
To remove one effect, select its active tile if needed, then select the delete button in that effect's settings card. The object's effects in the other two sections remain in place.
If Animation Timing Feels Wrong
| What you see | What to do |
|---|---|
| The object appears too late | Reduce the Entrance Delay. |
| Emphasis starts later than expected | Remember that its Delay begins after the entrance finishes. |
| Movement is too fast or slow | Adjust Duration and preview again. |
| The effect never stops | Change Repeat from Infinite to No Repeat or a number. |
| A previous effect disappeared | You selected another effect in the same section; use Undo or reselect the intended effect. |
| The exit pauses slide navigation | Shorten the Exit Duration or remove the exit effect. |
Quick Check
Before continuing, make sure that:
- every animated object has an instructional reason to move;
- Entrance and Emphasis timing establishes a clear reading order;
- continuous repetition is not distracting;
- Exit effects do not make navigation feel slow; and
- the complete sequence works in Present.
Previous: Configure Action Settings · Next: Add Slide Transitions · Back to Part X · Back to the full guide