
2.1: Dashboard Overview
The dashboard is your home base after you sign in. This is where you find presentations, choose how to create something new, and move to the other parts of your workspace.
You do not need to memorize every control. Take a short tour first, then use the dashboard as a map whenever you are unsure where to go next.
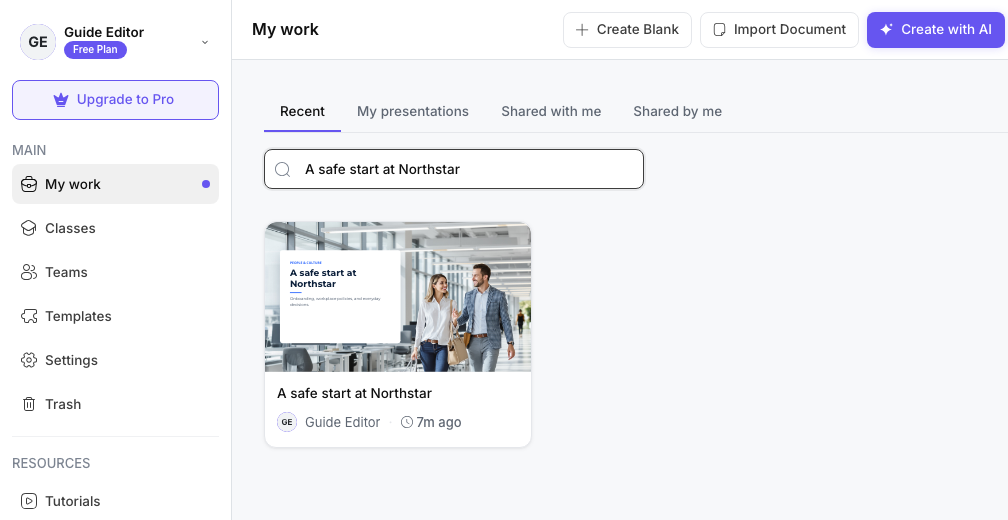
Before You Begin
Sign in and wait for My work to finish loading. If you see learner assignments instead of presentation tools, switch from Student View to Teacher View in the top bar.
The presentations and tools you see depend on your account, active team, role, and plan. Your screen may contain more presentation cards than the example above.
1. Start With The Left Sidebar
Look down the left side of the dashboard. The currently selected area has a highlighted background and a colored dot. When you first arrive, this is usually My work.
The main destinations are:
| Destination | When to use it |
|---|---|
| My work | Create, find, and organize presentations. |
| Classes | Assign lessons, manage learners, and follow class activity. |
| Teams | Work with team members, shared resources, and team-owned content. |
| Templates | Browse reusable lesson designs and start from one. |
| Settings | Manage account and workspace preferences. |
| Trash | Restore deleted presentations or remove them permanently. |
Below the main destinations, the Resources group provides shortcuts such as Tutorials, Contact Support, Community, and Refer a Friend.
Select My work again whenever you want to return to your presentation library.
2. Choose A Creation Method
At the top of My work, choose the starting point that matches what you want to make:
- Select Create Blank when you want to choose the layout and build the content yourself.
- Select Import Document when you want AI to turn a supported source document into a presentation.
- Select Create with AI when you want a first draft from a topic, prompt, or outline.
You do not need to start a presentation during this tour. For now, simply notice where these three buttons are. Later lessons explain each workflow step by step.
3. Choose The Right Library View
The tabs above the search box decide which presentations appear:
| Tab | What it shows |
|---|---|
| Recent | Work you opened or changed recently. |
| My presentations | Presentations owned by you or your active workspace. |
| Shared with me | Presentations another person shared with you. |
| Shared by me | Presentations you shared with other people. |
Select a tab and give the library a moment to refresh. If you belong to more than one team, check the active team in your user menu when an expected presentation is missing. Changing workspaces changes which owned and team content is available.
Deleted presentations are kept separately under Trash in the left sidebar.
4. Find A Presentation
When the library becomes busy, use the controls above the presentation cards:
- Select Search presentations and type part of a presentation name.
- Open Sort by and choose Name, Date Created, Date Modified, Owner, or Date accessed.
- Use the adjacent direction button to switch between ascending and descending order.
- Choose Grid view for visual cards or List view for compact rows.
- If the library has more than one page, use the page controls below the results.
Clear the search text to show the complete selected library view again.
5. Read A Presentation Card
A card gives you enough information to identify a presentation before opening it. Depending on the current view, it can show a thumbnail, title, owner, and the time it was last changed or accessed.
Select the card itself when you are ready to open the presentation. Card actions such as duplicate, add to classes, or move to trash are covered in a later section, so you can leave those controls alone during this tour.
6. Check The Workspace Controls
The remaining top-bar controls help you understand which workspace and account state you are using:
- Student View / Teacher View changes between learning and authoring experiences.
- The credits control shows your available AI credits and opens plan options.
- Language changes the interface language.
- The theme button switches between the light and dark app themes.
- Notifications shows account, sharing, class, team, and processing updates.
- Your user menu shows the signed-in account and lets you work with the active team or account options available to you.
- What's New? in the lower-left area opens recent product updates.
If a control is unavailable, your role, active view, subscription, or team permissions may not include it.
Try A Safe Dashboard Tour
You can practise without changing or deleting anything:
- Return to My work.
- Select each library tab and notice how the results change.
- Search for a presentation you recognize, then clear the search.
- Change the sort option and sort direction.
- Switch between grid and list views.
- Confirm that the correct account and team are active.
Quick Check
Before continuing, make sure you can answer these questions:
- Where do you create a blank presentation, import a document, or start with AI?
- Which tab contains work shared with you?
- Where do you search, sort, and change the library layout?
- Where do you switch between Teacher View and Student View?
- Where do you open Trash, Notifications, and What's New?
Previous: Prepare For Your First Project · Next: Find Work In Library Views · Back to Part II · Back to the full guide