
11.3: Control Player And Answer Behavior
The learner player should expose enough control to make the lesson understandable without offering navigation that breaks its teaching sequence. Presentation-wide player settings define the available controls; question settings define what happens immediately after an answer.
In this section, you will choose a player style, decide which controls learners can use, configure feedback and post-answer navigation, and test the learner-facing finish and retry states.
Before You Begin
Open Settings in the editor and decide whether learners should move freely or follow a guided sequence. A hidden button is a real behavior change, not only a visual preference.
1. Choose The Player Style And Spacing
Expand Player Settings.
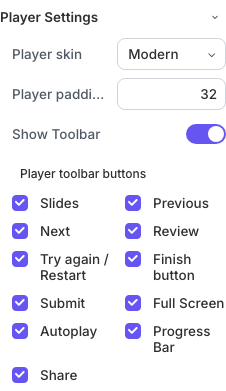
- Player skin chooses Classic or Modern. Both use the same authored behavior, but the controls are presented differently.
- Player padding sets the space around the presentation in the player. The current range is 0–256 pixels. Use more padding when the lesson needs visual breathing room; use less when content must occupy more of the window.
- Show Toolbar controls the player toolbar as a whole. When it is off, the individual toolbar-button choices are hidden and unavailable to the learner.
Use Present after changing the skin or padding. The editor canvas does not show the final player chrome.
2. Choose The Toolbar Buttons
When Show Toolbar is on, select the controls the learner should receive.
| Control | Learner use |
|---|---|
| Slides | Open the slide list and jump to an available slide. |
| Previous and Next | Move backward or forward when navigation is allowed. |
| Review | Open review information when the current result is reviewable. |
| Try again / Restart | Start another eligible attempt, or restart a presentation without questions. |
| Finish button | End an eligible question-based attempt when the player allows finishing. |
| Submit | Submit the current question response; after submission, the primary control can become Next when advancing is allowed. |
| Full Screen | Enter or leave full-screen playback. |
| Autoplay | Start, pause, or control automatic playback. |
| Progress Bar | Show viewed position across the presentation and provide slide navigation when allowed. |
| Share | Open sharing options for the hosted lesson. Offline HTML5, SCORM, and xAPI packages do not show this control because their launch URL may belong to an LMS rather than a reusable public page. |
For a guided assessment, consider limiting slide-jump controls while preserving Previous, Next, Submit, and the controls required to finish or retry. For reference material, Slides and Progress Bar make navigation faster.
3. Configure Feedback After A Question Is Submitted
Select a question, open Properties, and choose the question tab. Expand Feedback.
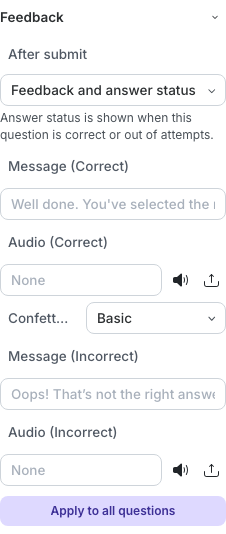
For a graded question, After submit provides three choices:
- None shows no authored feedback message.
- Feedback and answer status can show correct and incorrect messages, audio, and a confetti style for a correct response.
- Feedback only shows the submitted-feedback message and audio without revealing correct/incorrect status.
The current attempt policy affects when an answer status is revealed. With more than one presentation attempt, status is withheld until no presentation attempts remain. With one or unlimited attempts, status appears when the question is correct or its own attempts are exhausted.
Select Apply to all questions only when the same messages, audio, and confetti suit every question. Question-specific explanations are usually more useful than a generic response.
4. Choose What Happens After The Answer
Expand Navigation after Answer in the same question properties.
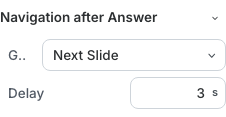
- Set Go to to Next Slide when the learner should advance automatically, or Stay on This Slide when they should review the result or decide when to continue.
- When Next Slide is selected, set Delay from 0.1 to 100 seconds. The default shown in a new question is 3 seconds.
- Allow enough time to read the feedback. A short delay can make a longer message disappear before the learner understands it.
The delay control is hidden for Stay on This Slide because no automatic navigation occurs.
5. Understand Finish, Try Again, And Review
These controls appear only when the learner state supports them:
- Finish is relevant to a question-based presentation while the attempt is still editable. Its position can change as the learner reaches the final slide and becomes eligible to finish.
- Try again appears after a finalized attempt when another attempt is allowed. If attempts are limited, the confirmation shows how many remain. A presentation without questions uses Restart instead.
- Review appears when the result can be reviewed. Its availability depends on the attempt and answer-reveal policy, not only on whether its toolbar checkbox is selected.
Hiding one of these toolbar controls does not change the underlying score or attempt limit. Configure Completion Criteria, Success Criteria, and Max Attempts first, then decide which valid actions to expose.
6. Test The Learner Sequence
Use Present and complete at least these checks:
- Submit a correct answer and an incorrect answer.
- Time the feedback and automatic navigation.
- Move through the lesson with every enabled navigation control.
- Finish with a passing result, then with a non-passing result.
- Start another attempt and confirm the remaining-attempt message.
- Leave an attempt unfinished, reopen it, and verify Resume On Restart.
- Check the player at desktop and narrow widths so the toolbar and primary action do not overlap the lesson.
Quick Check
Before finishing Part XI, make sure that you can:
- choose Classic or Modern and set player padding;
- explain what each toolbar choice exposes;
- configure feedback without revealing answers too early;
- choose Next Slide or Stay on This Slide with a readable delay;
- predict when Finish, Try again / Restart, and Review can appear; and
- verify the complete behavior in Present.
Previous: Configure Presentation Settings · Next: Part XII — Collaboration, Comments, And Version History · Back to Part XI · Back to the full guide