
7.4: Create Speech And Record Audio
Narration can explain a diagram, model a pronunciation, support learners who prefer listening, or make a self-paced lesson easier to follow. uPresenter can generate an audio object from text or record a microphone directly in the browser.
In this section, you will choose the right Text to Speech entry point, prepare the script, select a voice and instruction, generate and review the audio, and create a browser recording.
Before You Begin
Write a short script in the same natural voice you would use with a learner. Read it aloud once, simplify long sentences, and spell out abbreviations that a speech system might pronounce incorrectly.
For browser recording, connect a microphone and allow microphone access for uPresenter only when you are ready to record. Use headphones when speaker output could feed back into the microphone, and do not record private conversations or personal information without permission.
1. Choose How To Start Text To Speech
Use the entry point that matches the result you need:
- To create a new audio object, open Media and select Text to Speech.
- To turn existing slide text into audio, select the text object, open AI Writing in the floating toolbar, and select Convert to Speech. The text is placed in the speech pane for review; the original text remains on the slide.
- To regenerate an existing audio object, select it and choose Text to Speech in the floating toolbar. The new speech replaces that object's audio source and keeps the object in place.
The pane captures the destination slide when it opens. If you move to another slide while generation is running, the completed audio still belongs to the captured slide. Keep that slide available until generation finishes.
2. Prepare The Speech
Enter or review the script in Text to Speech. The Characters remaining counter changes as you type.
The current per-generation limits are:
| Active plan | Maximum text per generation |
|---|---|
| Free | 1,000 characters |
| Pro | 8,000 characters |
The counter is for the current script, not a cumulative monthly usage meter. Speech generation also uses account credits, so check the current Credits total before generating a long or repeated script. If the text exceeds the active limit, the pane shows Character limit exceeded and disables generation.
The pane does not currently include a separate language selector. Enter the script in the language you want spoken and review the finished pronunciation carefully. Voice samples follow the current interface's English or Vietnamese sample set; a sample is not a guarantee that every name, technical term, or other language will be pronounced correctly.
3. Choose An Instruction And Voice
Use Instructions to guide the speaking style. None leaves the style unspecified. Other choices include Friendly, Calm, Dramatic, Professional, Patient Teacher, and additional character-style presets.
The current voice list contains Alloy, Ash, Coral, Echo, Fable, Nova, Onyx, Sage, and Shimmer. Each card shows a style description and gender and age tags. Select a voice card, then use its Preview button to hear a short voice sample. Preview plays the sample, not the script you entered.
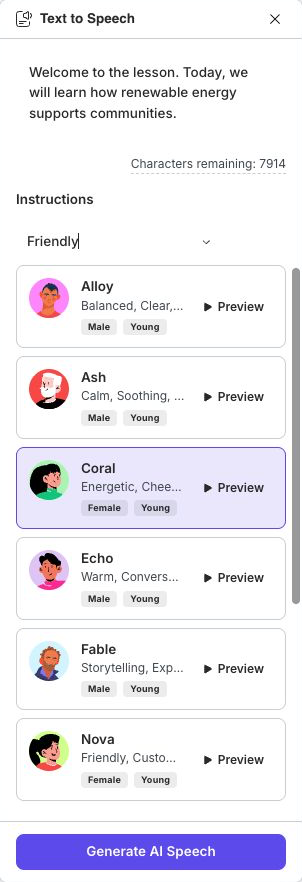
Choose for clarity and consistency, not novelty. A calm, steady voice usually works better for instructions; a more expressive voice may suit a story or scenario. Use the same voice for related narration unless a change identifies a different speaker.
4. Generate And Review The Speech
- Confirm the text, Instructions, selected voice, and remaining character count.
- Select Generate AI Speech.
- Wait while the pane reports that AI speech is being generated. Do not delete the destination slide during this step.
- When generation succeeds, select the inserted audio object and play it with its audio controls.
- Open Present and listen again in the learner experience.
Listen for mispronounced names, awkward pauses, clipped sentences, and an instruction that is too dramatic or too flat. To revise it, select the audio object, choose Text to Speech, edit the script or settings, and generate again.
The generated audio is part of the presentation's audio resources. You can reuse or download it from Resources > Audio, or use Download Audio while the audio object is selected.
5. Record Audio In The Browser
Open Media and select Record Audio. uPresenter checks browser support, microphone access, and connected input devices before opening Audio Recorder.
In Audio Recorder:
- Choose the microphone under Input Device.
- Select Record. The timer starts at
00:00:00. - Select the center control to pause. Select Continue Recording when you are ready to resume.
- Select Retry to discard the current take and start again.
- Select Done to finish the take and display the audio preview.
- Play the preview and listen for volume, noise, missing words, and long silence.
- Select Insert to upload the take and place an audio object on the current slide. Select Close to leave without inserting it.
The input selector is unavailable while recording. If the active microphone disconnects, recording pauses and uPresenter reports the problem; reconnect or choose another device before continuing.
New recorded audio is inserted with playback controls and autoplay enabled. Open Properties > Playback to change Mode, Controls, Autoplay, or Loop. Test the result in Present, because a learner's browser may block autoplay.
6. Manage Generated And Recorded Clips
Open Resources and select Audio. Generated and recorded clips can be previewed and reused like uploaded audio.
- Select a resource to insert another instance on the current slide.
- Select an audio object and use Change Audio > Resources to keep its position while changing the source.
- Select resource checkboxes to download or delete unused clips.
- Remove every slide instance before deleting a protected resource.
Use clear filenames for uploaded audio when you can. Recordings are uploaded by the browser with a generated recording name, so play them before reuse to confirm that you selected the intended take.
If Speech Or Recording Does Not Work
| What you see | What to do |
|---|---|
| Character limit exceeded | Shorten the script or divide it into multiple meaningful audio clips. |
| Generate AI Speech is unavailable | Enter text, select a voice, stay within the character limit, and confirm that the account has credits. |
| A name or term is pronounced incorrectly | Rewrite it phonetically, expand an abbreviation, or record that passage yourself. |
| The original slide is no longer available | Reopen Text to Speech from the correct slide and generate again. |
| Text to Speech cannot determine where to place the audio | Close the pane, reselect the intended object or slide, and reopen the tool. |
| The browser reports no recording support | Use a current browser with microphone recording support, or record externally and upload the file through Media > Audio. |
| No microphone is listed | Connect the device, check operating-system input settings, and reopen Record Audio. |
| Microphone access is denied | Allow microphone access for uPresenter in the browser's site permissions, then reopen the recorder. |
| The recording is quiet or noisy | Move closer to the microphone, reduce background noise, check the selected input, and make another take. |
| Audio does not autoplay for a learner | Keep Controls enabled so the learner can start playback manually. |
Quick Check
Before finishing Part VII, make sure that:
- the script is within the active plan's current character limit;
- the selected voice and instruction make the content easy to understand;
- the final generated audio, not only the voice sample, has been reviewed;
- microphone recordings have been previewed before insertion;
- important narration has a transcript or equivalent text alternative; and
- every audio clip works in Present mode and in the intended delivery environment.
Previous: Insert Images, Audio, And Video · Next: Questions And Assessments · Back to Part VII · Back to the full guide