
4.1: Understand The Editor Screen
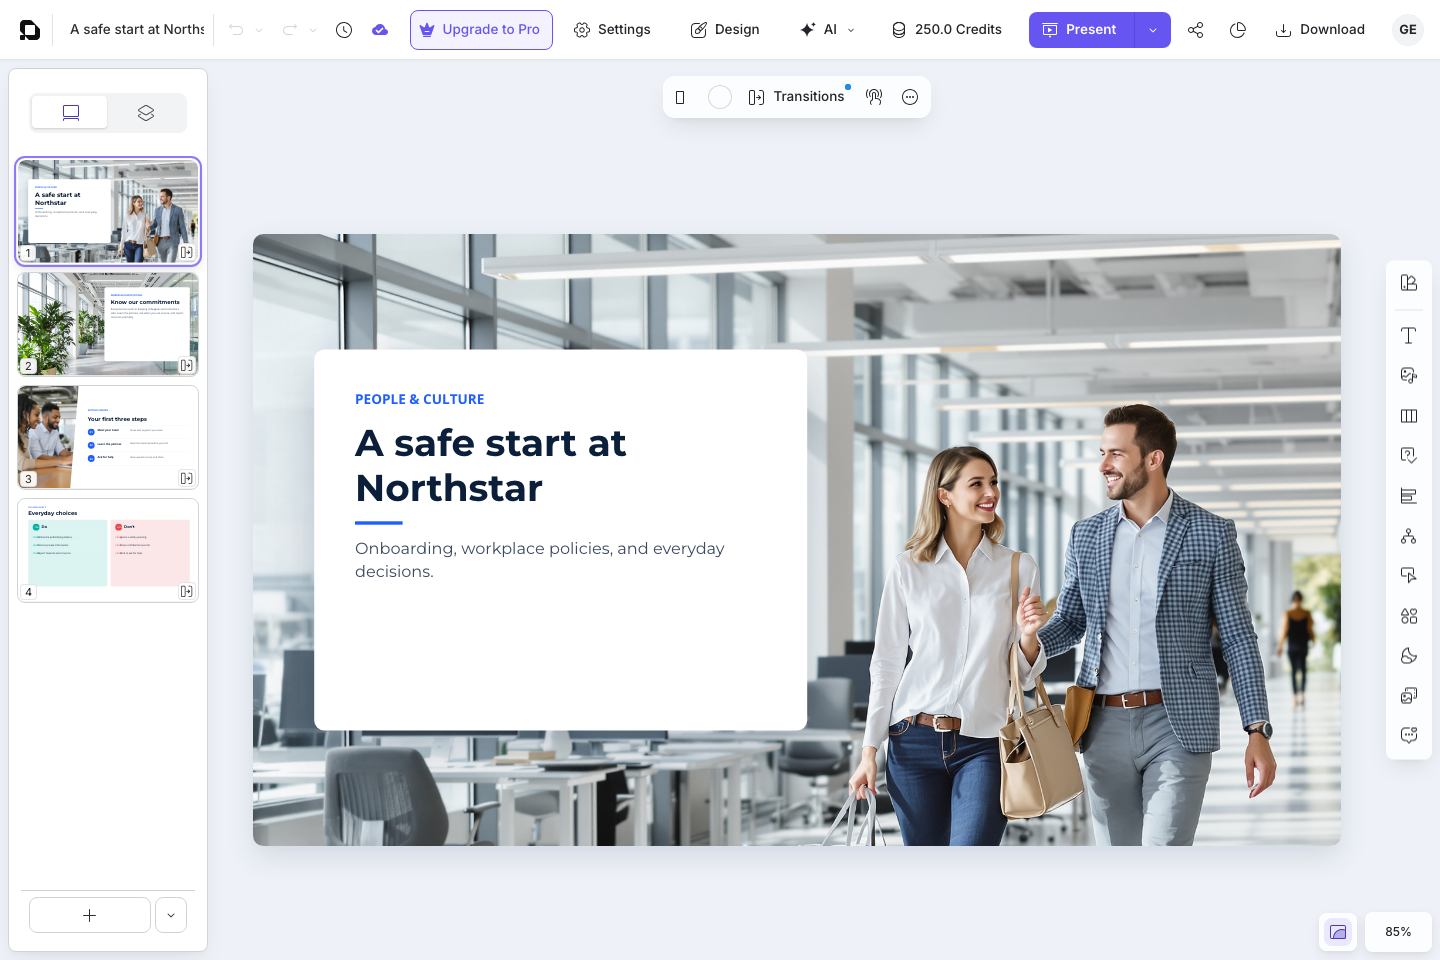
The editor is where a presentation becomes a learning experience. You can design slides, add questions and interactions, configure the learner experience, preview the result, share it, and open reports without moving between separate products.
This section introduces the main areas of the current desktop editor. The exact controls can change with your permission, subscription, selected object, and presentation type.
1. Open The Editor
From My work, select a presentation card or row. The presentation opens in the editor with the current slide in the center.
If you have view or comment permission instead of edit permission, some authoring controls are hidden or unavailable. Ask the owner for editing access when you need to change the presentation.
2. Recognize The Main Areas
| Area | What it does |
|---|---|
| Top bar | Returns to the dashboard, shows the presentation title and save state, and provides project-wide actions. |
| Slides and Layers pane | Navigates pages or reveals the object stack on the current slide. |
| Canvas | Shows the current slide and is the main area for selecting, moving, resizing, and editing objects. |
| Selection toolbar | Floats above the canvas and changes to match the selected slide or object. |
| Vertical toolbox | Adds content and opens editor panes such as Properties, Resources, Layers, and Comments. |
| Properties pane | Provides detailed controls for the selected slide or object. |
| View controls | Changes zoom, fits the slide to the workspace, and toggles Trim view. |
The editor may move or hide panes on a narrow screen. A desktop or laptop gives you the most space for authoring.
3. Use The Top Bar
Read the top bar from left to right:
- Select the uPresenter logo to return to the dashboard.
- Select the presentation title to rename it.
- Use Undo, Undo history, Redo, and Redo history to move through recent editing actions.
- Open Version History when you need to inspect saved versions rather than only recent actions.
- Check the save-status icon before closing the tab or moving to another task.
- Open Settings for presentation and learner-experience settings.
- Open Design for presentation-wide visual choices.
- Open AI for AI Agent or Connect AI.
- Check Credits before a credit-based AI operation.
- Select Present to review the learner experience. The arrow beside it offers From current slide, From beginning, and Present in new tab.
- Use the share icon, report icon, and Download to continue into collaboration, analytics, or export.
This is one of the editor's main eLearning advantages: authoring, preview, delivery, and tracking entry points stay attached to the same presentation.
4. Navigate Slides And Layers
The left pane has two tabs.
- Slides shows page thumbnails. Select a thumbnail to open that slide. Select New for a blank slide, or open More add slide options to choose another slide type or layout.
- Layers shows the objects on the current slide. Use it when objects overlap, when an object is difficult to select on the canvas, or when you need to understand the stacking order.
You can hide the pane to create more canvas space and reopen it with Slides in the vertical toolbox.
5. Work On The Canvas
Selecting the empty slide gives you slide-level controls such as Layout, Background Color, Transitions, and Interactions. Selecting an object changes the floating toolbar to controls that apply to that object.
For example, a text selection can show font and text-formatting controls, while a media object can show a source-replacement command and media-specific options. This keeps common actions close to the content you are editing.
6. Add Content From The Toolbox
The vertical toolbox contains the current authoring entry points:
- Text
- Media
- Groups
- Questions
- Charts & Tables
- Infographics
- Buttons
- Shapes
- Icons
It also opens workspace panes including Properties, Resources, Layers, and Comments. The available tools allow a lesson to combine explanation, media, assessment, and interaction in one presentation.
7. Distinguish The Selection Toolbar From Properties
Use the floating selection toolbar for frequent commands. Open Properties when you need exact or less common settings.
For a selected object, Properties can contain Size & Position, fill and border choices, transform controls, effects, and tabs for object-specific settings. A text object, question, chart, table, media object, or 3D model can therefore show a different set of controls.
If a setting you expect is missing, check that you selected the intended object and not the slide or a surrounding group.
Quick Check
Before continuing, make sure that you can:
- identify the top bar, left pane, canvas, selection toolbar, toolbox, properties pane, and view controls;
- switch between Slides and Layers;
- explain why the selection toolbar changes; and
- find Settings, Design, AI, Present, sharing, reports, and Download.
Previous: Use Inspiration And Remix Public Content · Next: Navigate And Make Basic Edits · Back to Part IV · Back to the full guide