
2.3: Manage Presentation Actions And Trash
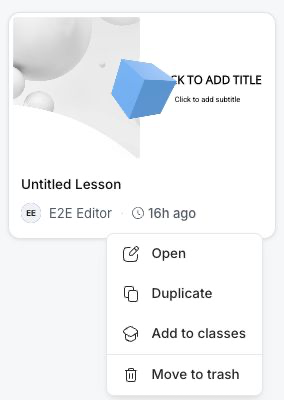
Presentation actions let you open existing work, create a reusable copy, assign a lesson to classes, or remove content from the active library. The commands you see depend on ownership and permissions.
Before You Begin
Select My work, then open My presentations or Recent. Use a practice presentation when you want to try duplication or Trash without affecting content that learners use.
Shared presentations may offer fewer actions. uPresenter shows management commands such as Add to classes and Move to trash only when your current account can manage that presentation.
1. Open A Presentation
Select the presentation card or list row to open it in the editor. You can also open the presentation actions menu and select Open.
If you came from Recent, returning to the dashboard refreshes the recent order so the presentation you just opened can move toward the top.
2. Rename A Presentation
The current dashboard action menu does not contain a Rename command.
- Open the presentation.
- Select its title in the editor header.
- Enter the new title and finish the edit.
- Return to My work and confirm the new title appears on the card or row.
Use a name that identifies the topic, audience, or version. Clear names are easier to recognize later in classes and reports.
3. Duplicate A Presentation
Duplication creates a separate editable presentation and leaves the original unchanged.
- Open the presentation actions menu.
- Select Duplicate.
- In the Duplicate dialog, review the suggested New name. The default adds
- Copyto the current name. - Change the name if needed, then select Duplicate.
- Wait for the copy to open in the editor.
Return to My work when you want to see both the original and the copy. Use duplication for a new audience, a new class, or a variation that should not change the source presentation.
4. Add A Presentation To Classes
- Open the presentation actions menu.
- Select Add to classes.
- In the Add to classes dialog, select one or more classes.
- Select Add.
- Wait for the success message before closing or navigating away.
If the dialog says You have no classes., create a class first. Class setup and learner assignment are covered later in the guide.
5. Move A Presentation To Trash
- Confirm that you selected the correct owned presentation.
- Open its presentation actions menu.
- Select Move to trash.
The dashboard moves the presentation immediately and removes it from the current view. Open Trash in the left sidebar if you need to restore it.
Moving a presentation to Trash is safer than permanent deletion, but it can make the presentation unavailable to people who were using it. Check active classes, published links, and collaborators before removing important work.
6. Restore A Presentation
- Select Trash in the left sidebar.
- Find the presentation.
- Open its presentation actions menu.
- Select Restore.
- Wait for Presentation restored successfully.
- Return to My work and confirm the presentation is available again.
Selecting the body of a trashed card also opens a Restore presentation confirmation. Either route returns the presentation to the active library.
7. Permanently Delete One Presentation
- Open Trash.
- Open the presentation actions menu.
- Select Permanently delete.
- Read the confirmation carefully.
- Select Delete only when you no longer need the presentation or its stored resources.
Permanent deletion cannot be undone. uPresenter confirms completion and updates the account's used storage after the item is removed.
8. Empty Trash
When Trash contains presentations, Empty Trash appears at the top of the page.
- Review every item in Trash.
- Select Empty Trash.
- In the confirmation dialog, select Empty trash.
This permanently deletes all items in Trash. Restore anything you may need before confirming.
Work With Several Presentations
Owned presentation cards and rows include selection checkboxes. After you select one item, uPresenter shows the selection controls and keeps the other checkboxes visible.
- In a normal library view, select Move to trash (N) to move the selected presentations together.
- In Trash, select Restore (N) or Permanently delete (N).
- Select Clear to leave selection mode without changing any presentation.
Bulk permanent deletion uses a confirmation dialog. Bulk moves to Trash and bulk restores happen when you select their action, so review the selected count first.
Quick Check
Before continuing, make sure you know:
- where to rename a presentation;
- why Duplicate is safer than editing an original for a new audience;
- which actions depend on ownership;
- how to restore an item from Trash; and
- the difference between Move to trash and Permanently delete.
Previous: Find Work In Library Views · Next: Import A Presentation Package · Back to Part II · Back to the full guide