
5.2: Use A Fixed Slide Layout
A fixed slide keeps one design width and height throughout the presentation. It is a good choice for projected presentations, predictable image or PDF output, and compositions that depend on exact placement.
1. Open Fixed Layout Settings
- Open the presentation in the editor.
- Select Design in the top bar.
- Expand Layout if it is closed.
- Under Type, select Slide (Traditional).
- Under Positioning, choose Freeform for direct placement or Auto Layout when containers should arrange their content.
Type applies to the whole presentation, not only the active slide. Change it early when possible, and preview every slide after converting an existing presentation.
2. Choose A Preset Slide Size
Open Slide Size and choose the format that matches the delivery destination.
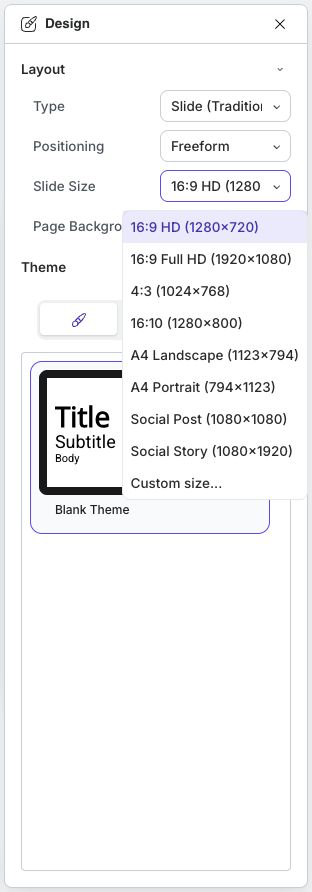
| Preset | Dimensions | Typical use |
|---|---|---|
| 16:9 HD | 1280 × 720 | Standard widescreen lessons and presentations |
| 16:9 Full HD | 1920 × 1080 | Full HD displays and high-resolution output |
| 4:3 | 1024 × 768 | Older displays or source material built for 4:3 |
| 16:10 | 1280 × 800 | Widescreen displays with a taller aspect ratio |
| A4 Landscape | 1123 × 794 | Landscape document-style output |
| A4 Portrait | 794 × 1123 | Portrait handouts or document-style pages |
| Social Post | 1080 × 1080 | Square visual content |
| Social Story | 1080 × 1920 | Portrait story content |
The labels show design pixels, not a physical print guarantee. Check the final PDF or image in the intended destination before distribution.
3. Set A Custom Size
- Open Slide Size and select Custom size....
- Enter the design-pixel Width and Height. The current editor accepts values from 320 to 3840.
- Select outside the field to commit the value.
- Wait for All changes saved.
Use a consistent size throughout one presentation. If an external system requires exact dimensions, confirm whether it expects pixels, print dimensions, or an aspect ratio before entering the values.
4. Review The Result
Changing the presentation size can move, crop, or expose space around existing content.
- Inspect each slide with Trim view on.
- Check objects near every edge and any object using automatic width or height.
- Select Fit to screen after the canvas dimensions change.
- Select Present and check text wrapping, media, questions, and navigation.
- Make a small test export if the final destination is PDF or images.
You can also set Page Background in the Layout section. Choose a background that preserves readable contrast across the whole presentation, especially behind text, icons, and detailed media.
Quick Check
Before continuing, make sure that you can:
- select Slide (Traditional);
- distinguish Freeform from Auto Layout positioning;
- choose the correct preset aspect ratio;
- enter a custom width and height; and
- preview the presentation after a size change.
Previous: Manage Slides And Layers · Next: Build A Fluid Lesson · Back to Part V · Back to the full guide