
7.2: Upload, Reuse, And Manage Resources
The Resources pane is the media library for the presentation you are editing. It keeps uploaded images, videos, audio files, and 3D models in one place so you can reuse a file on several slides instead of uploading another copy.
In this section, you will open the library, upload and find files, insert or replace media, download selected files, and safely remove resources that are no longer needed.
Before You Begin
Open a presentation in the editor. You need editing permission to upload or delete resources; viewers cannot upload, and commenters cannot delete resources.
Prepare files in one of the supported formats and check their size before uploading:
| Resource type | Supported formats | Maximum size per file |
|---|---|---|
| Images | JPG, JPEG, PNG, GIF, SVG, AVIF, WEBP, BMP | 5 MB |
| Videos | MP4, WEBM | 50 MB |
| Audio | AAC, MP3, WAV, OGG, FLAC, OPUS, M4A | 30 MB |
| Models | GLB, GLTF | 50 MB |
For a GLTF model, include its materials and textures in the file when possible. A GLB file is often easier to reuse because it can keep the model and its supporting assets together.
1. Open And Browse Resources
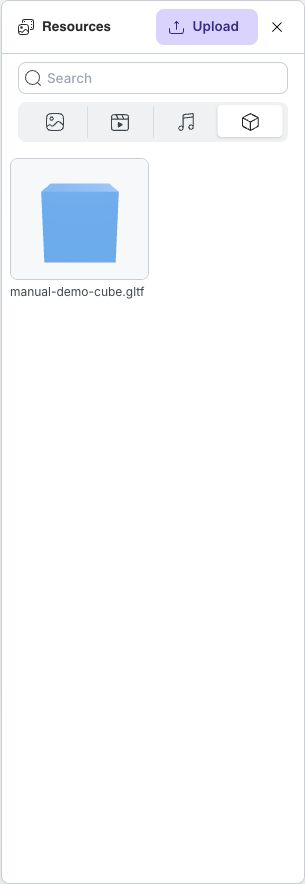
On the right side of the editor, select Resources. The pane opens with Search, Upload, and four media tabs:
- Images shows uploaded image files.
- Videos shows uploaded MP4 and WEBM files.
- Audio shows uploaded sound files and lets you preview them.
- Models shows uploaded GLB and GLTF files.

Select a tab to see only that type of resource. Use Search to filter the current tab by filename. If a search returns nothing, clear or shorten the search text before checking another file.
The example below shows a reusable model in Models. Images and videos appear as thumbnails; audio resources appear as rows with playback controls.
2. Upload Files To The Presentation
- Select Upload at the top of the Resources pane.
- Choose one or more supported files from your device.
- Confirm the file selection.
- Watch the upload or processing status in the appropriate tab.
- Wait until the normal resource card appears before inserting the file or leaving the editor.
uPresenter determines the destination tab from each file's extension, so one selection can contain more than one resource type. Uploading adds a file to the current presentation's library; it does not automatically place that file on the slide.
3. Insert Or Reuse A Resource
Select the slide where you want the media, then open the matching resource tab.
- Select a resource card to insert it in the center area of the current slide.
- Drag a resource card onto the canvas when you want to choose its starting position directly.
After insertion, move or resize the object as needed. Selecting the same resource again places another instance on the slide without uploading a duplicate file. This is useful for recurring logos, sound effects, demonstration clips, and models used in more than one part of a lesson.
4. Replace Existing Media From Resources
You can reuse a library item while replacing an object that is already positioned and styled.
- Select the image, video, audio object, or 3D model on the slide.
- In the floating toolbar, open Change Image, Change Video, Change Audio, or Change 3D Model, depending on the selected object.
- Select Resources.
- Search for and select the replacement file.
- Check the object on the canvas. Adjust its fit, size, playback settings, or model rotation if the replacement has different proportions or behavior.
The resource picker stays attached to the selected object, so the chosen library file replaces that object's source rather than creating an unrelated object.
5. Select And Download Resources
Move the pointer over a resource card and select its checkbox. Once selection mode starts, you can select more cards in the same tab. The action bar at the bottom shows the selected count and the available actions.
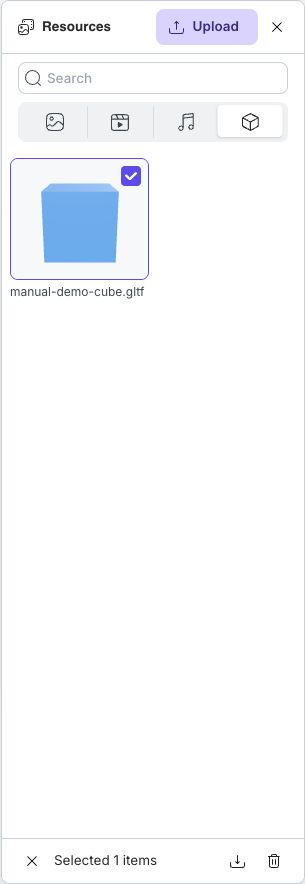
Select Download selected to save each selected source file to your device. Your browser may ask whether to allow multiple downloads when several files are selected. Switching resource tabs or closing the pane clears the current selection.
6. Delete Resources Safely
Only delete a resource when you are sure the presentation no longer needs it. Resource deletion is permanent and cannot be undone from the editor.
- Select the checkbox on each resource you want to remove.
- Select Delete selected in the bottom action bar.
- Read the confirmation, then select Delete only if the selected files are no longer needed.
uPresenter protects any resource that is still used on a slide. Instead of deleting it, the app opens Resource in use and identifies each slide where it appears.
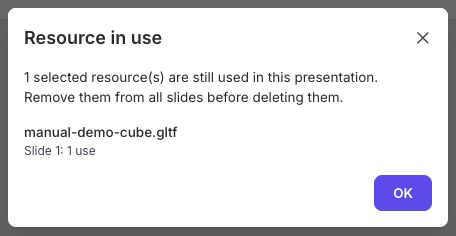
Select OK, remove every instance of that resource from the listed slides, then return to Resources and try again. Replacing an object with a different resource also removes that object's use of the old file, but the old file remains protected until no slide uses it.
If An Upload Or Resource Action Fails
| What you see | What to do |
|---|---|
| The file type is not supported | Convert the file to one of the formats in the table above, then upload the converted copy. Renaming an unsupported extension does not convert the file. |
| The file exceeds the maximum size | Compress or shorten the media, reduce image dimensions, simplify the model, or export it in a more efficient supported format. |
| Failed to upload file. | Check the network connection, keep the editor open, and try the upload again. |
| No access permission | Ask the presentation owner for editing permission. |
| A resource does not appear | Open the tab that matches the file type, clear Search, and allow processing to finish. |
| A model has missing textures | Prefer GLB or a self-contained GLTF file with embedded materials and textures. |
| A download does not start | Allow downloads for uPresenter in the browser, including multiple downloads when more than one file is selected. |
| Resource in use appears | Remove the resource from every slide listed in the dialog before deleting it from the library. |
Quick Check
Before you finish, make sure that:
- Every uploaded file appears in the correct resource tab.
- Reused media loads correctly on each slide where you inserted it.
- Replacement media still fits the object's position and intended behavior.
- Your browser saved any source files you chose to download.
- You removed media from all slides before permanently deleting its resource.
Previous: Add And Use A 3D Model · Next: Insert Images, Audio, And Video · Back to Part VII · Back to the full guide