
6.1: Format Text And Manage Fonts
Text should make the lesson easy to scan, not merely fill the slide. uPresenter gives you quick formatting in the selection toolbar and more detailed character, paragraph, and text-box controls in Properties.
1. Insert A Text Object
Open the presentation and select the slide that needs text. On the right side of the editor, select Text, then choose one of the Default text styles:
- Title for the main heading;
- Subtitle for supporting context; or
- Body for explanations, instructions, and longer content.
The new text object uses the presentation theme. This is useful because a later theme change can update the presentation more consistently than formatting every object independently.
2. Edit And Select Text
Double-click inside a text object to edit its words. Drag across text when a formatting change should affect only part of the content; select the object itself when the change should affect the whole text box.
Use concise headings and break long explanations into short paragraphs or lists. In an eLearning slide, the spoken narration and the visible text should support each other instead of repeating a dense script word for word.
3. Use The Selection Toolbar
When a text object is selected, the toolbar above the canvas provides the most common controls.

From left to right, the available controls include the object's background, border, and drop shadow; AI Writing; font family and size; text color and stroke; Bold, Italic, Underline, and Strikethrough; formula insertion; Bullet & Numbering; alignment; and the object's animation, interaction, and More menus.
The list menu currently offers None, Disc, Circle, Square, 1, 2, 3…, a, b, c…, and A, B, C…. The alignment menu offers Left, Center, Right, and Justify.
Use Text Stroke sparingly. Set its width first, then choose a stroke color that keeps the letter shapes readable. A heavy stroke can make small text harder to recognize.
4. Refine Text In Properties
Select Properties, then select the Text tab.
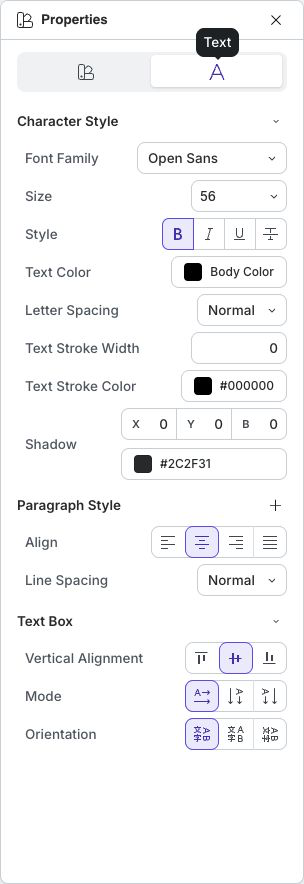
The panel is divided into three sections:
- Character Style controls Font Family, Size, style toggles, Text Color, Letter Spacing, text-stroke width and color, and text shadow.
- Paragraph Style controls alignment and Line Spacing. Select Add property when you need spacing before or after a paragraph.
- Text Box controls vertical alignment, horizontal or vertical writing mode, and text orientation.
Check vertical writing and orientation changes in Present mode. They can be useful for labels or decorative headings, but long instructional text is usually easiest to read horizontally.
5. Add Link Behavior
The current text toolbar does not expose a command for linking only a selected word or phrase. To make the entire text object act as a link or navigation control, select the object, open Interactions, and add the appropriate event and action, such as opening a URL or moving to another slide.
Test the interaction in Present mode. Make link text descriptive so learners understand where it will take them, and avoid using color alone to communicate that text is interactive.
6. Rewrite Text With AI Writing
Select the text you want to revise, then open AI Writing. The current quick actions are:
- Improve Writing;
- Fix Grammar;
- Make Shorter;
- Make Longer;
- Professional Tone;
- Casual Tone;
- Custom Prompt…; and
- Text to Speech.
Review the result before keeping it. Confirm that terminology, instructions, facts, and the intended reading level are still correct. Text to Speech continues into the text-to-speech workflow covered in Part VII.
7. Add And Remove Web Fonts
Open the font-family control in the selection toolbar or under Character Style, then select Manage Fonts….
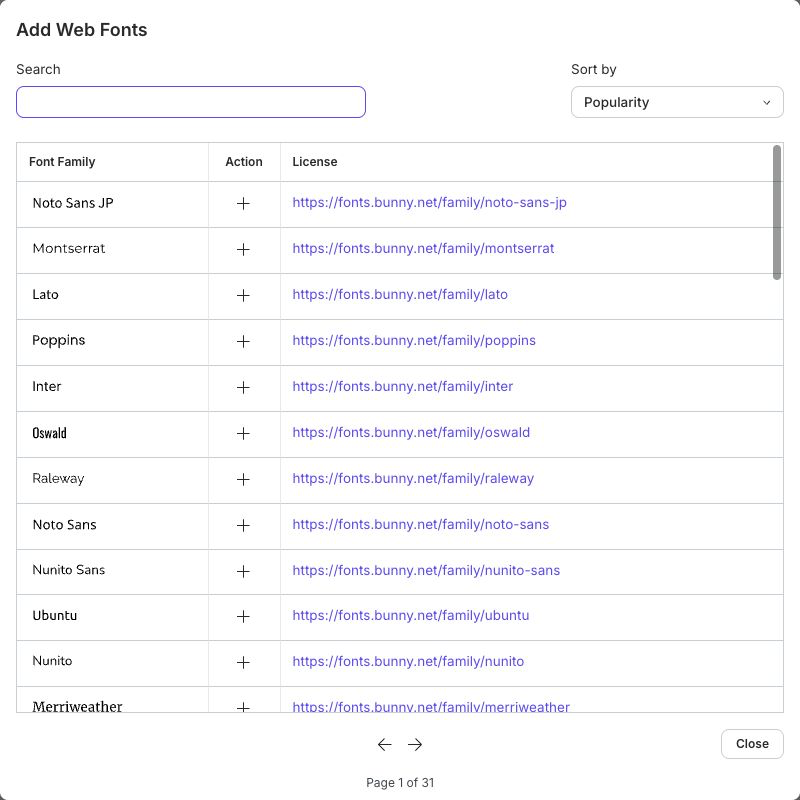
In Add Web Fonts:
- Enter part of a family name under Search.
- Use Sort by to choose Popularity, Alphabetical, Date added, Trending, or Style.
- Review the live font preview.
- Select the plus action to add the font to this presentation.
- Follow the link in the License column when you need to review the font's licensing information.
- Select Close when you finish.
An added font becomes available to the presentation; it does not automatically change existing text. Choose it from the font-family control after adding it.
The remove action is unavailable while a font is used directly on a slide or by the presentation's Title, Subtitle, or Body theme styles. Change those uses first, then return to Manage Fonts… to remove the now-unused family. This protection prevents a presentation from silently falling back to another font.
Quick Check
Before continuing, make sure that you can:
- insert Title, Subtitle, and Body text;
- format selected text with the toolbar and Properties;
- create a list and set paragraph alignment or spacing;
- add navigation or URL behavior to a whole text object through Interactions;
- use and review an AI Writing result; and
- add a web font and explain why an in-use font cannot be removed.
Previous: Arrange Content With Group Layouts · Next: Use Shapes, Lines, And Connectors · Back to Part VI · Back to the full guide