
18.2: Configure Team Settings
Team Settings keeps the workspace identity, plan, shared credits, join link, and lifecycle controls together. In this section, you will update those settings and understand which actions depend on your role or subscription.
Before You Begin
Open Teams, find the workspace, select Settings, and stay on the Overview tab. Owners and admins can edit most workspace details. Members see the information but have fewer controls.
1. Update The Team Logo
- In Team Logo, select the avatar.
- Select Upload, or Change when a logo already exists.
- Choose a JPG, JPEG, PNG, GIF, SVG, AVIF, WebP, or BMP image no larger than 5 MB.
To remove an existing logo, open the same avatar menu and select Delete. The team then falls back to initials.
2. Edit Team Information
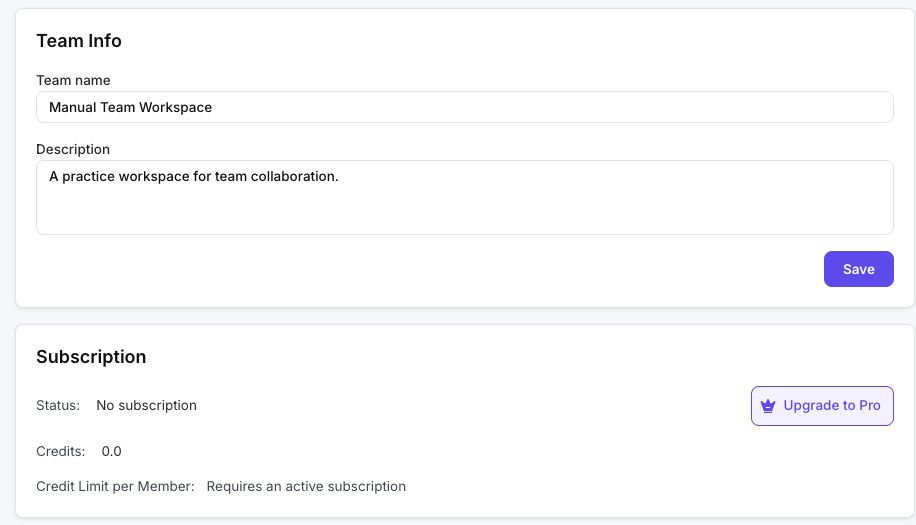
- In Team Info, update Team name or Description.
- Select Save.
The name accepts up to 100 characters in the current form, and the description accepts up to 500. Use a name that members will recognize in the Teams list and active-workspace switcher.
3. Review The Subscription And Seats
The Subscription card can show:
- Status: No subscription, Active, Overdue, Pending, Expired, or Canceled.
- Billing period: Monthly, Quarterly, Annual, or Biennial, when supplied by the license.
- Seats: active seats used followed by seats purchased, for example
3 / 5. - End date and an expiry or grace-period badge when relevant.
- Credits available to the team.
Only the owner can start Upgrade to Pro or Renew for this team. If a recurring subscription is still active, renewal may be handled automatically and no manual renewal action is shown.
4. Set The Default Credit Limit
On a team whose license is active or in its supported overdue grace period, an owner or admin can set Credit Limit per Member:
- Choose Daily, Weekly, Monthly, Total, or No limit.
- For a limited period, enter the credit amount.
- Select Save.
Members who do not have an individual override inherit this team default. The control reads Requires an active subscription when team-credit enforcement is unavailable. Part XIX explains personal and team credits in more detail.
5. Leave A Team
If you are an admin or member, Leave Team appears on Overview. Select it and confirm only when you no longer need access; leaving removes your access to everything in that workspace and returns the app to another available workspace.
An owner cannot leave their own team. Ownership must be resolved before departure rather than abandoning a workspace with no owner.
6. Delete A Team
The Danger Zone appears only to the owner of a non-personal team.
- Confirm that the team and its shared work are no longer needed.
- If a live purchased subscription blocks deletion, cancel it where the provider supports cancellation, or wait until it is canceled or expired.
- Select Delete Team.
- Review the permanent-deletion warning and select Delete.
You cannot delete the personal workspace attached to your account from Team Settings. Team deletion cannot be undone, so use it only after retaining anything the organization must keep.
Troubleshooting
| What happens | What to do |
|---|---|
| Team fields are read-only | You are a Member. Ask an Owner or Admin to update the details. |
| Upgrade to Pro or Renew is missing | Only the Owner can purchase or renew the team license. Also check whether the current subscription auto-renews. |
| Credit limits cannot be edited | Confirm that the team license is Active or in a supported Overdue grace period and that your role is Owner or Admin. |
| Delete Team is disabled | A live subscription still protects the workspace. Use its supported cancellation flow or wait until the license is canceled or expired. |
| Danger Zone is missing | It is hidden for personal workspaces and for users who are not the owner. |
Previous: Understand And Switch Workspaces · Next: Manage Members And Invitations · Back to Part XVIII · Back to the full guide