
18.1: Understand And Switch Workspaces
Teams give an organization a shared place to create and manage uPresenter work. In this section, you will distinguish personal and team workspaces, create a team, switch the active team, and choose seats when upgrading a team.
Before You Begin
Open Teams from the main navigation. Every team you own or have joined appears here.
1. Understand The Workspace Model
Every account has a personal workspace. It carries your personal plan and is the safe place for work that does not belong to an organization. A team workspace has its own identity, members, subscription, seats, and credits.
Only one workspace is Active at a time. The active team supplies the context for the work, plan, and credits shown elsewhere in the app. Switching teams does not delete or transfer content; it changes which workspace you are currently using.
Membership, role, and seat status are separate:
| Signal | What it tells you |
|---|---|
| Owner, Admin, or Member | Which team-management actions you can perform. |
| Free Plan or Pro Plan | Which plan currently applies to that team. |
| Seats | How many paid member places the team license provides. This is not necessarily the team's total member count. |
| Active | Which workspace is currently selected. |
2. Read And Organize The Teams Page
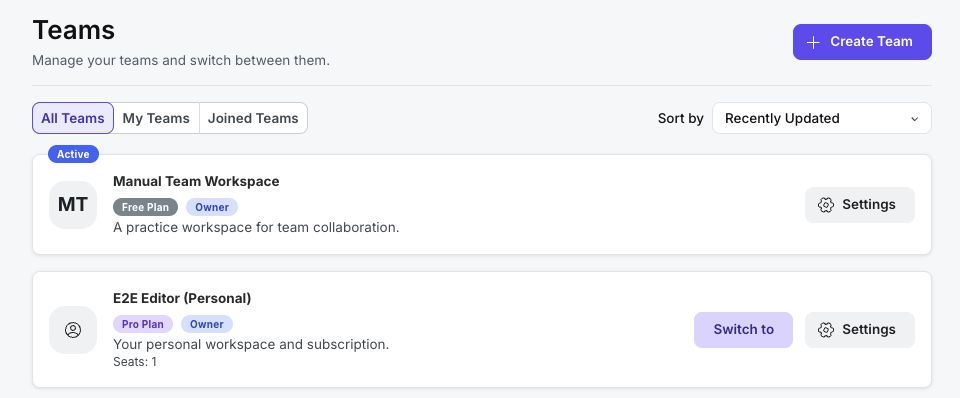
Use the three filters to narrow the list:
- All Teams shows every team you can access.
- My Teams shows teams you own.
- Joined Teams shows teams you joined without becoming their owner.
Use Sort by to order the current list by Recently Updated, Created Date, or Name. A team's card shows its plan, your role, description, seat count when available, license warnings when relevant, and the Settings action.
3. Create A Team
- Select Create Team.
- Enter a Team name of up to 100 characters.
- Add an optional Description of up to 500 characters. State the department, school, client, or program the workspace serves so members can identify it later.
- Select Create Team.
- In the activation dialog, select Activate to make the new team your current workspace and open its settings. Select Cancel if you want to create it without switching yet.
A newly created team starts on the Free plan. Creating a team does not move existing presentations or invite members automatically.
4. Switch The Active Team
On the Teams page, select Switch to on the workspace you want to use. The Active badge moves to that card, and plan- and credit-sensitive areas refresh for the selected workspace.
Before creating, importing, purchasing, or sharing important work, check the active team. This small habit prevents content or billing from ending up under the wrong workspace.
5. Upgrade A Team And Choose Seats

- Open the team's Settings and stay on Overview.
- In Subscription, select Upgrade to Pro. An owner can also use a visible pricing entry point elsewhere in the dashboard.
- In Plans and Pricing, confirm Your Team. Only teams you own can be selected for billing.
- Choose Monthly or Yearly billing.
- Set Seats from 1 to 500. Choose enough seats for the people who need the team's paid benefits; do not simply copy the total invitation count.
- Review the current price, included credits, storage, export, analytics, collaboration, and administration features.
- Select Subscribe and complete the provider's checkout.
The displayed price and payment flow can vary by country, currency, billing cycle, and payment provider. A seat is consumed by an active member on a licensed team. An inactive member can remain associated with the team without using a paid seat and uses the Free-level workspace context until activated.
If an activation would exceed the purchased seats, the owner is directed to purchase capacity. An admin who cannot authorize that purchase is told to ask the owner.
Troubleshooting
| What happens | What to do |
|---|---|
| The wrong plan or credits are shown | Return to Teams and confirm which card has the Active badge. |
| A team is missing | Select All Teams, clear any assumptions about ownership, and check both My Teams and Joined Teams. |
| A new team is not active | Select Switch to on its card. Choosing Cancel after creation leaves it inactive. |
| The billing team is not the team you expected | In Plans and Pricing, check Your Team before continuing. Only owners can purchase for a team. |
| A member cannot be activated | Check the license status and the used/purchased seat count. Renew or add seats if needed. |
Previous: Part XVII — Classes And Learner Management · Next: Configure Team Settings · Back to Part XVIII · Back to the full guide