
5.4: Arrange Content With Group Layouts
A group lets related objects move and resize as one unit. A group layout goes further by arranging the group's children in a row, column, grid, or tile pattern. This is especially useful for responsive fluid lessons, but the same controls are available in fixed presentations.
1. Create Or Select A Group
To create a group from existing objects:
- Select two or more compatible objects on the canvas or in Layers.
- Open More or the selection context menu.
- Select Group.
- Select Properties in the vertical toolbox.
You can also insert a prepared group from Groups in the toolbox, which lists Basic column layouts, Tiles, and Dividers (Horizontal Divider, Vertical Divider). In Layers, expand the group to confirm which objects belong to it before changing the layout.
2. Choose A Container Layout
In Properties, find Container Layout and open Direction.
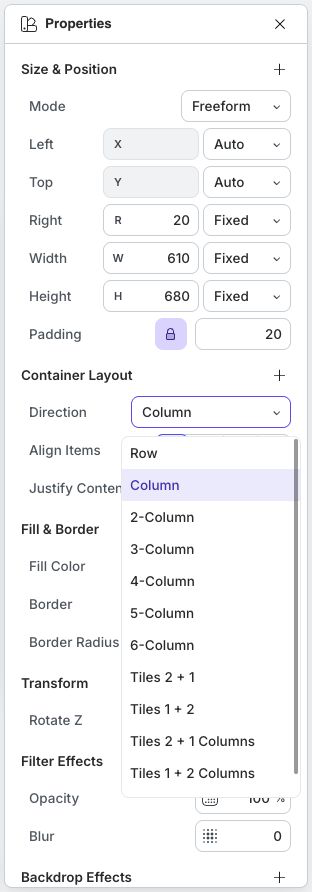
| Direction | Arrangement |
|---|---|
| Row | Places children side by side in one horizontal flow |
| Column | Stacks children vertically |
| 2-Column through 6-Column | Places children in a repeating grid with that number of columns |
| 2-Column (1:2), 2-Column (2:1), 3-Column (2:1:1), 3-Column (1:1:2) | Uses the same column counts with an uneven width ratio |
| Tiles 2 + 1 | Uses an asymmetric three-item tile pattern |
| Tiles 1 + 2 | Reverses the emphasis of the three-item tile pattern |
| Tiles 2 + 1 Columns | Uses the column-oriented 2 + 1 tile variant |
| Tiles 1 + 2 Columns | Uses the column-oriented 1 + 2 tile variant |
| None | Removes automatic child arrangement so objects can use their own positions |
Choose a pattern that matches the number and importance of the child objects. A six-column layout can be technically valid but too dense for long labels or narrow learner screens.
3. Refine Spacing And Alignment
Use Add property in Container Layout when you need Spacing between children. Then use:
- Align Items to control alignment across the layout's cross axis; and
- Justify Content to distribute or position children along its main axis.
The meaning of horizontal and vertical alignment changes with Row and Column. Watch the canvas while changing the controls instead of assuming the same icon has the same visual direction in both layouts.
Use Padding under Size & Position to create space between the group boundary and its children. Padding and child spacing solve different problems: padding affects the outside edge of the group; spacing affects the gaps between children.
4. Reorder Or Nest Group Children
Open Layers, expand the group, and drag its child rows into the intended order. For a Row or Column, the tree order determines the visual sequence. You can also drag a compatible object into the group when the insertion indicator shows that it will be nested.
After nesting or reordering:
- Confirm the layer tree structure.
- Check the canvas at the current width.
- Resize the group or change Max Width if you are working in a fluid lesson.
- Select Present and verify reading order, focus order, interactions, and responsive behavior.
5. Remove The Group Safely
Select the group and choose Ungroup when the children should become independent again. Ungrouping removes the group layout relationship, so inspect the children's positions immediately afterward and use Undo if the result is not useful.
Quick Check
Before continuing, make sure that you can:
- create and select a group;
- choose Row, Column, a column grid, a tile layout, or None;
- distinguish padding from child spacing;
- align, justify, reorder, and nest group children; and
- preview the group at the learner's expected width.
Previous: Build A Fluid Lesson · Next: Format Text And Manage Fonts · Back to Part V · Back to the full guide