
10.2: Configure Action Settings
After adding an action, use its card to define the target, destination, message, or feedback style. Settings belong to the action card, while Event controls when it is triggered. Optional Conditions decide whether the action runs when that event occurs.
In this section, you will configure every action family, edit tooltip content, use slide-enter feedback, and remove an action safely.
Before You Begin
Open a presentation, select the slide or object that owns the interaction, and open Interactions. Add the action you want to configure if it is not already present.
Expand an action card by selecting its header. Use the Remove button in that card to remove only that action.
1. Choose The Event
Open Event and choose the learner or presentation event that should run the action. An ordinary object currently offers Click, Mouse Enter, Mouse Leave, and Double Click.
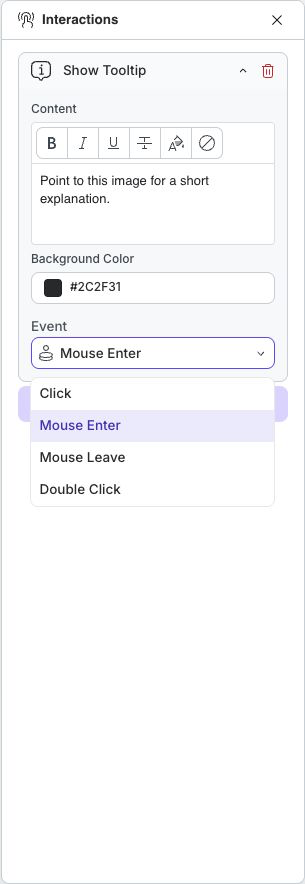
For essential information, prefer Click over pointer-only events so the same control remains understandable on touch devices. Use Double Click only when the slide clearly teaches that gesture.
2. Configure Presentation And Navigation Actions
The following actions do not require an extra setting: Pause Presentation, Resume Presentation, Finish, Next Slide, Previous Slide, Go to First Slide, and Go to Last Slide.
Two navigation actions require a destination:
- Go to Slide opens a searchable Slide list. This is the safer choice for a named branch because it continues to point to that slide when the deck is reordered.
- Go to Slide at Index uses a visible, one-based Slide index. Enter
1for the first slide. Review index-based actions whenever slides are inserted, removed, or reordered.
Use a clear, visible button for branching. If a learner must choose between several paths, label each option by outcome rather than with generic text such as “Next.”
3. Choose Media And Visibility Targets
Play Media, Pause Media, and Toggle Play/Pause Media show an Object selector for compatible media on the current slide. Choose the exact audio or video object the action should control.
Show, Hide, and Toggle Visibility also use an Object selector. Give target layers descriptive names before configuring several reveal actions; names such as “Safety explanation” are easier to verify than auto-generated layer numbers.
Use Show and Hide when the final state must be predictable. Use Toggle Visibility when repeating the event should alternate between visible and hidden.
4. Add Explanations And Feedback
Show Tooltip is available for object interactions. Enter the tooltip Content, apply bold, italic, underline, strikethrough, or text color where useful, and choose its Background Color. Keep the tooltip short enough to read without covering the object it explains.
The current inline tooltip editor does not expose image or video insertion controls. Use visible slide media or Open Dialog when the explanation needs more space than formatted text can provide.
Open Dialog provides Title and Content fields for a longer message. Use it for instructions, definitions, or feedback that needs more room than a tooltip.
Play Confetti provides these Confetti Type choices: Basic, Fireworks, Stars, School Pride, Snow, Fountain, Explosion, and Rain. Reserve celebration for a meaningful completion or success moment.
When the slide itself is selected, every action uses On Enter. The example below plays confetti as soon as the slide opens.
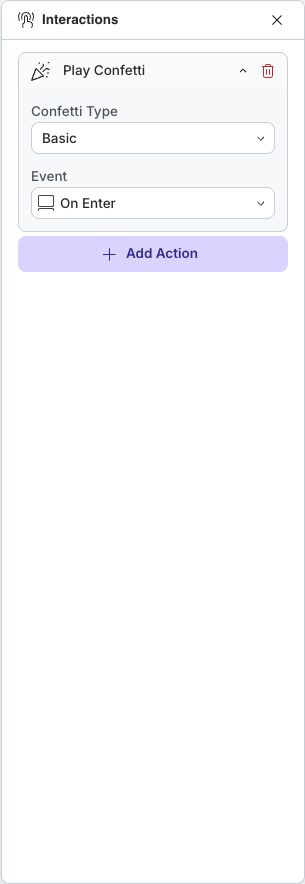
For a graded question, use Correct or Incorrect to provide outcome-specific feedback. Keep the instructional message useful even when celebration or other visual effects are unavailable to a learner.
5. Configure Submit And External Actions
Submit does not need another setting. Use it only when the presentation's assessment flow is ready for the learner to submit.
Open URL provides a URL field. Enter a complete destination such as https://example.org/resource, test it in Present, and tell learners when the link leaves the lesson or opens an external site.
6. Adjust Variables And Add Conditions
Choose Adjust Variable from the Variables action group to update a custom value during playback. Choose the Variable, Operation, and any required Value, then select Save Settings. Available operations depend on the variable type. Use Variables covers creation, system values, operations, and attempt behavior.
Select Add Condition below an action's Event to restrict it using custom or system variables. Choose All conditions (AND) or Any condition (OR), configure the rules, and select Save. The card then displays a Run only if summary that you can select to edit. Set Action Conditions explains comparisons, removal, and how to test both outcomes.
7. Review, Add, Or Remove Actions
Select Add Action to add another action to the same selection. Expand each card and verify its Event and settings separately.
To remove an action, select Remove in that card. The object or slide remains; only the selected action is removed. Use Undo if you remove the wrong card.
Quick Check
Before continuing, confirm that:
- every navigation action points to the intended slide;
- media and visibility actions target the correct named object;
- tooltip and dialog text is concise and readable;
- confetti supports a meaningful feedback moment;
- external links use complete, tested URLs; and
- each action uses the intended Event, with any Run only if conditions checked in Present.
Previous: Build Interactions · Next: Animate Objects · Back to Part X · Back to the full guide