
14.2: Build A Public Profile
A public profile gives authors a stable page for their identity and selected published presentations. It is useful when learners, clients, or collaborators should be able to browse more than one piece of public work.
In this section, you will activate the profile, choose its address, add profile and social information, and control which presentations appear.
Before You Begin
Open Settings from the dashboard. The Public Profile tab is available in Teacher View. If the dashboard is in Student View, switch to Teacher View first.
The tab ends with Danger Zone > Delete my account, described in Section 19.5.
Review the privacy statement beside the profile switch. The current interface warns that your name, profile picture, email, and selected content may be publicly visible. Use an account identity and contact details that are appropriate for a public page.
1. Activate The Public Profile
- Open the Public Profile tab.
- Turn on Public Profile.
- Enter a Username in Profile Details if the account does not already have one. The Public Profile URL appears in the same card.
- Select Save at the bottom of the tab; one Save applies to the whole tab.
The username becomes part of the public profile address. It can contain letters, numbers, underscores, and hyphens, with a maximum of 50 characters. When you leave the field, uPresenter checks whether a changed username is available.
When the profile is active and has a username, Public Profile URL and View Public Profile appear.
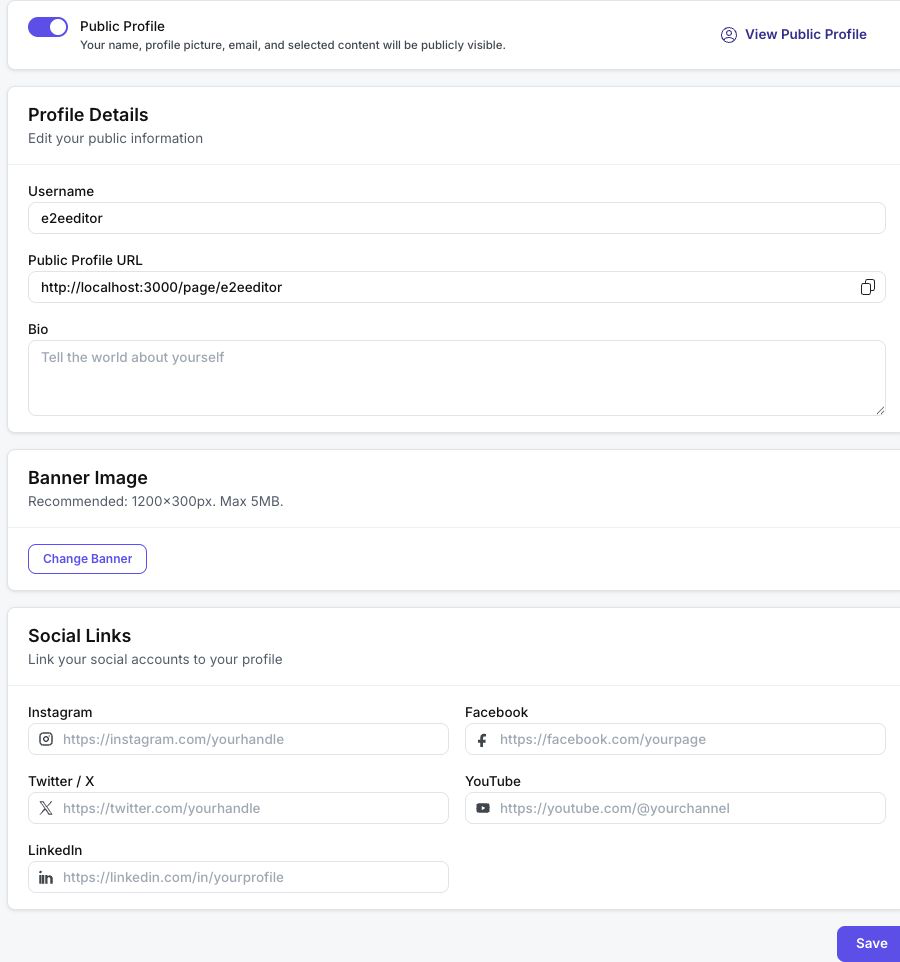
Choose a username that will still make sense after a particular course or campaign ends. Changing it also changes the profile address, so previously shared profile links may stop reaching the intended page.
2. Add Public Profile Details
Under Profile Details:
- Confirm the Username.
- Add a concise Bio that explains what you create and who it is for. The field accepts up to 500 characters.
- Select Save after making changes.
Profile descriptions are checked before publication. If a bio is rejected, remove promotional spam, misleading language, or inappropriate content and try again.
Your display name and profile picture come from the main Profile tab. Return there to update Full name or select Change photo, then save those changes separately.
3. Add A Banner Image
Under Banner Image, select Change Banner and choose an appropriate image. The interface recommends 1200 × 300 pixels and accepts an image up to 5 MB.
Use a wide image with a quiet center so the profile remains readable at different widths. Supported profile and banner uploads include common web image formats such as JPEG, PNG, GIF, SVG, AVIF, WebP, and BMP.
When a banner already exists, Remove Banner returns the profile to its default background after you save.
4. Add Social Links
Under Social Links, enter complete public URLs for any accounts you want to display:
- Instagram;
- Facebook;
- Twitter / X;
- YouTube; and
- LinkedIn.
Leave a field empty when that account should not appear. Select Save, then use View Public Profile and test every visible icon in a new tab. A malformed or private-account URL can send visitors to the wrong destination even though it saves successfully.
5. Choose Which Presentations Appear
The profile page does not show every presentation you own. A presentation appears only when:
- Publish this presentation for public viewing is on;
- Show on Social Profile and Inspiration is selected in that presentation's Public access panel; and
- the author's Public Profile remains active.
The public page shows the profile identity, bio and social links when provided, followed by Presentations. Select a presentation card to open its learner-facing link. Profiles with more than eight eligible presentations use pagination.
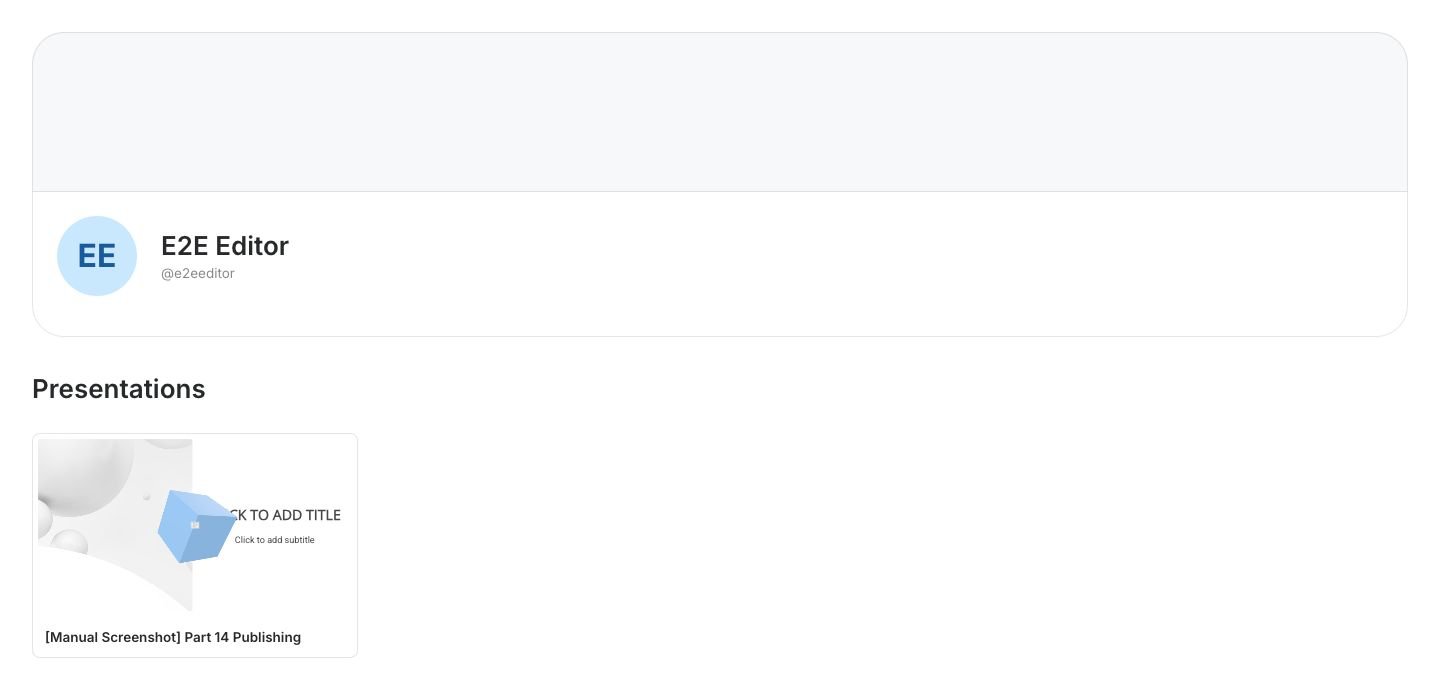
Use the presentation's own Public access settings to add or remove individual work. Turning off the entire public profile hides the profile page, but a presentation whose public publication remains on can still be reachable through its direct public link.
6. Review The Page As A Visitor
Select View Public Profile, then check the page at desktop and phone widths.
- Confirm the display name, username, picture, banner, and bio.
- Open every social icon and verify its destination.
- Check that only intended presentations appear.
- Open each presentation card and repeat its login, name, and password tests.
- Confirm that titles and thumbnails are suitable for a public audience.
Use a signed-out browser for the final privacy check. An owner can see content through permissions that a visitor does not have.
Troubleshooting
| What happens | What to do |
|---|---|
| The Public Profile tab is missing | Switch the dashboard to Teacher View. |
| The username is taken | Choose another available name, then leave the field to run the availability check again. |
| Characters disappear while typing | Usernames accept only letters, numbers, underscores, and hyphens. |
| The public page is not found | Turn on Public Profile, enter a username, select Save, and open the current Public Profile URL. |
| A presentation is missing | Check the presentation's publication and Show on Social Profile and Inspiration settings. |
| A social icon is missing | Enter a complete URL in the matching field and select Save. |
| A photo change is not reflected | Update and save the photo from the main Profile tab, then reload the public page. |
Previous: Publish A Public Link · Next: Share On Social Channels · Back to Part XIV · Back to the full guide