
5.1: Manage Slides And Layers
Slides define the order of a lesson. Layers define how objects are stacked and grouped on the current slide. This section shows how to use both views without losing track of what is selected.
Use a practice presentation while learning. uPresenter saves editor changes automatically, so check All changes saved before leaving.
1. Select And Navigate Slides
- Open Slides in the left pane.
- Select a thumbnail to make that slide active. The canvas and selection toolbar update to match it.
- Scroll the thumbnail list to move through a longer presentation.
- To select non-adjacent slides, hold Ctrl on Windows or Command on macOS while selecting thumbnails. To select a continuous range, select the first slide, hold Shift, and select the last slide.
The most recently focused slide appears on the canvas. A multi-slide selection lets commands such as duplicate, delete, cut, and copy act on the selected slides together.
2. Add A Slide
Select New at the bottom of the Slides pane to add a blank slide quickly. Select the arrow beside New when you want a prepared starting point.
The current Add Slide gallery includes Add slide with AI, title and content presets, question slides, chart slides, and infographic slides. Choose the structure closest to the learning purpose, then replace its sample content. A preset saves arrangement time; it does not make the content accurate or complete.
3. Duplicate, Copy, Or Delete Slides
Select one or more thumbnails, then open More in the slide-level selection toolbar.
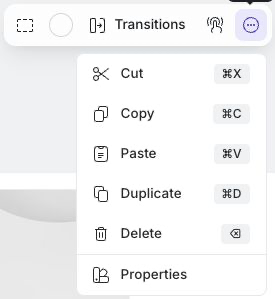
- Duplicate places a copy of every selected slide after the selected range.
- Cut, Copy, and Paste move or reuse slides. Pasted slides are inserted after the focused slide.
- Delete removes every selected slide. If all slides are removed, uPresenter creates a new blank slide so the presentation is not left without a page.
Use Undo immediately if the result is not what you intended. Before deleting several slides, confirm the selection highlight in the thumbnail pane rather than relying only on the slide shown on the canvas.
4. Reorder Slides
Drag a thumbnail to its new position in the Slides list. When several slides are selected, dragging one of the selected thumbnails moves the selected set together.
After reordering, check transitions, go-to-slide interactions, question sequencing, and any instructions that mention slide order. A visually correct order can still change the learner path.
5. Switch To Layers
Select Layers at the top of the left pane. The tree lists the objects on the current slide.
- Select a row to select that object on the canvas.
- Hold Ctrl or Command to add or remove individual rows from the selection.
- Hold Shift to select a continuous range of visible rows.
- Expand a group to inspect its children.
- Drag rows to change stacking order or place an object inside a compatible group. Watch the insertion indicator before releasing the pointer.
An object higher in the layer stack normally appears in front of objects below it. Nesting changes ownership as well as visual order, so verify movement, resizing, animation, and interactions after dropping an object into a group.
6. Group, Lock, And Hide Objects
Select two or more compatible objects, then open their More or context menu and select Group. Select a group and choose Ungroup to return its children to separate objects.
Each layer row exposes visibility and lock controls when you move over it or when that state is active:
- Hide keeps the object in the presentation but removes it from the normal canvas. It does not hide the object in Present; use Properties > Object State > Initially Hidden for that. Use Show to restore it on the canvas.
- Lock protects the object from accidental canvas edits. Use Unlock before changing it.
To work on every object at once, right-click in the Layers pane and select Select all (Ctrl+A). That is the only command in the Layers context menu: hiding and locking stay on the layer rows themselves, and there are no separate commands named “Lock All” or “Hide All.”
7. Understand Current Slide Preview And Image Export Availability
The current editor does not expose a Timeline control for multi-slide preview. Use the Slides thumbnails for navigation and select Present to check the complete learner sequence.
The current Download menu exports the presentation as PNG or JPG images. It does not expose a command for downloading only the focused slide or an arbitrary thumbnail selection. If you need one image, export the presentation and keep the required slide image from the downloaded set.
Quick Check
Before continuing, make sure that you can:
- add a blank slide or choose an Add Slide preset;
- select one slide, a range, or several non-adjacent slides;
- duplicate, delete, and reorder slides;
- switch between Slides and Layers;
- select, reorder, and nest layer objects; and
- group, ungroup, lock, unlock, hide, and show objects.
Previous: Work Faster With Keyboard Shortcuts · Next: Use A Fixed Slide Layout · Back to Part V · Back to the full guide